

Time after time, it strikes me how often Shopify merchants hunt for better ways to track what happens in their stores - sometimes they want split tests too. Shopify gives numbers about traffic and performance, yet misses explaining why visitors leave without buying. Enter PostHog: a fit for those gaps. This post walks through how we started plugging holes with PostHog, just enough to begin collecting real behavior clues today. Finding gaps in PostHog’s official Shopify setup steps, we put together our own version. Even though that documentation exists, it didn’t cover everything needed for complete tracking.
Got everything ready? Here’s what you’ll need before diving into the PostHog setup steps:
- Create your Posthog account, organization, & project
- Have an admin or staff account on Shopify with access to edit customer events.
Quick answer
To install PostHog on Shopify and capture standard events, add the PostHog web snippet to theme.liquid, then create a custom pixel under Settings → Customer events, paste the event-capture snippet, and connect it. Verify the setup in PostHog by checking for events such as Pageview, checkout_started, product_added_to_cart, and checkout_completed. Before you start, you need a PostHog account and a Shopify admin or staff account with access to edit customer events.
Step 1: Grab the PostHog snippet
Similar to step 1 in Installing PostHog on WordPress, start by grabbing your PostHog snippet from your project’s settings:
- Log in to your PostHog account.
- Navigate to Project Settings.
- Find the Web snippet section and copy the HTML snippet provided.
Note: If you see person_properties set to 'identified_only' in the script, change it to 'always' for maximum coverage. This ensures that all user interactions are tracked, even for anonymous users.
Step 2: Inject the Snippet into Your Shopify Theme
In Shopify, go to Sales Channels → Online Store → Themes.
Click on the three dots next to your theme’s name and select Edit code.
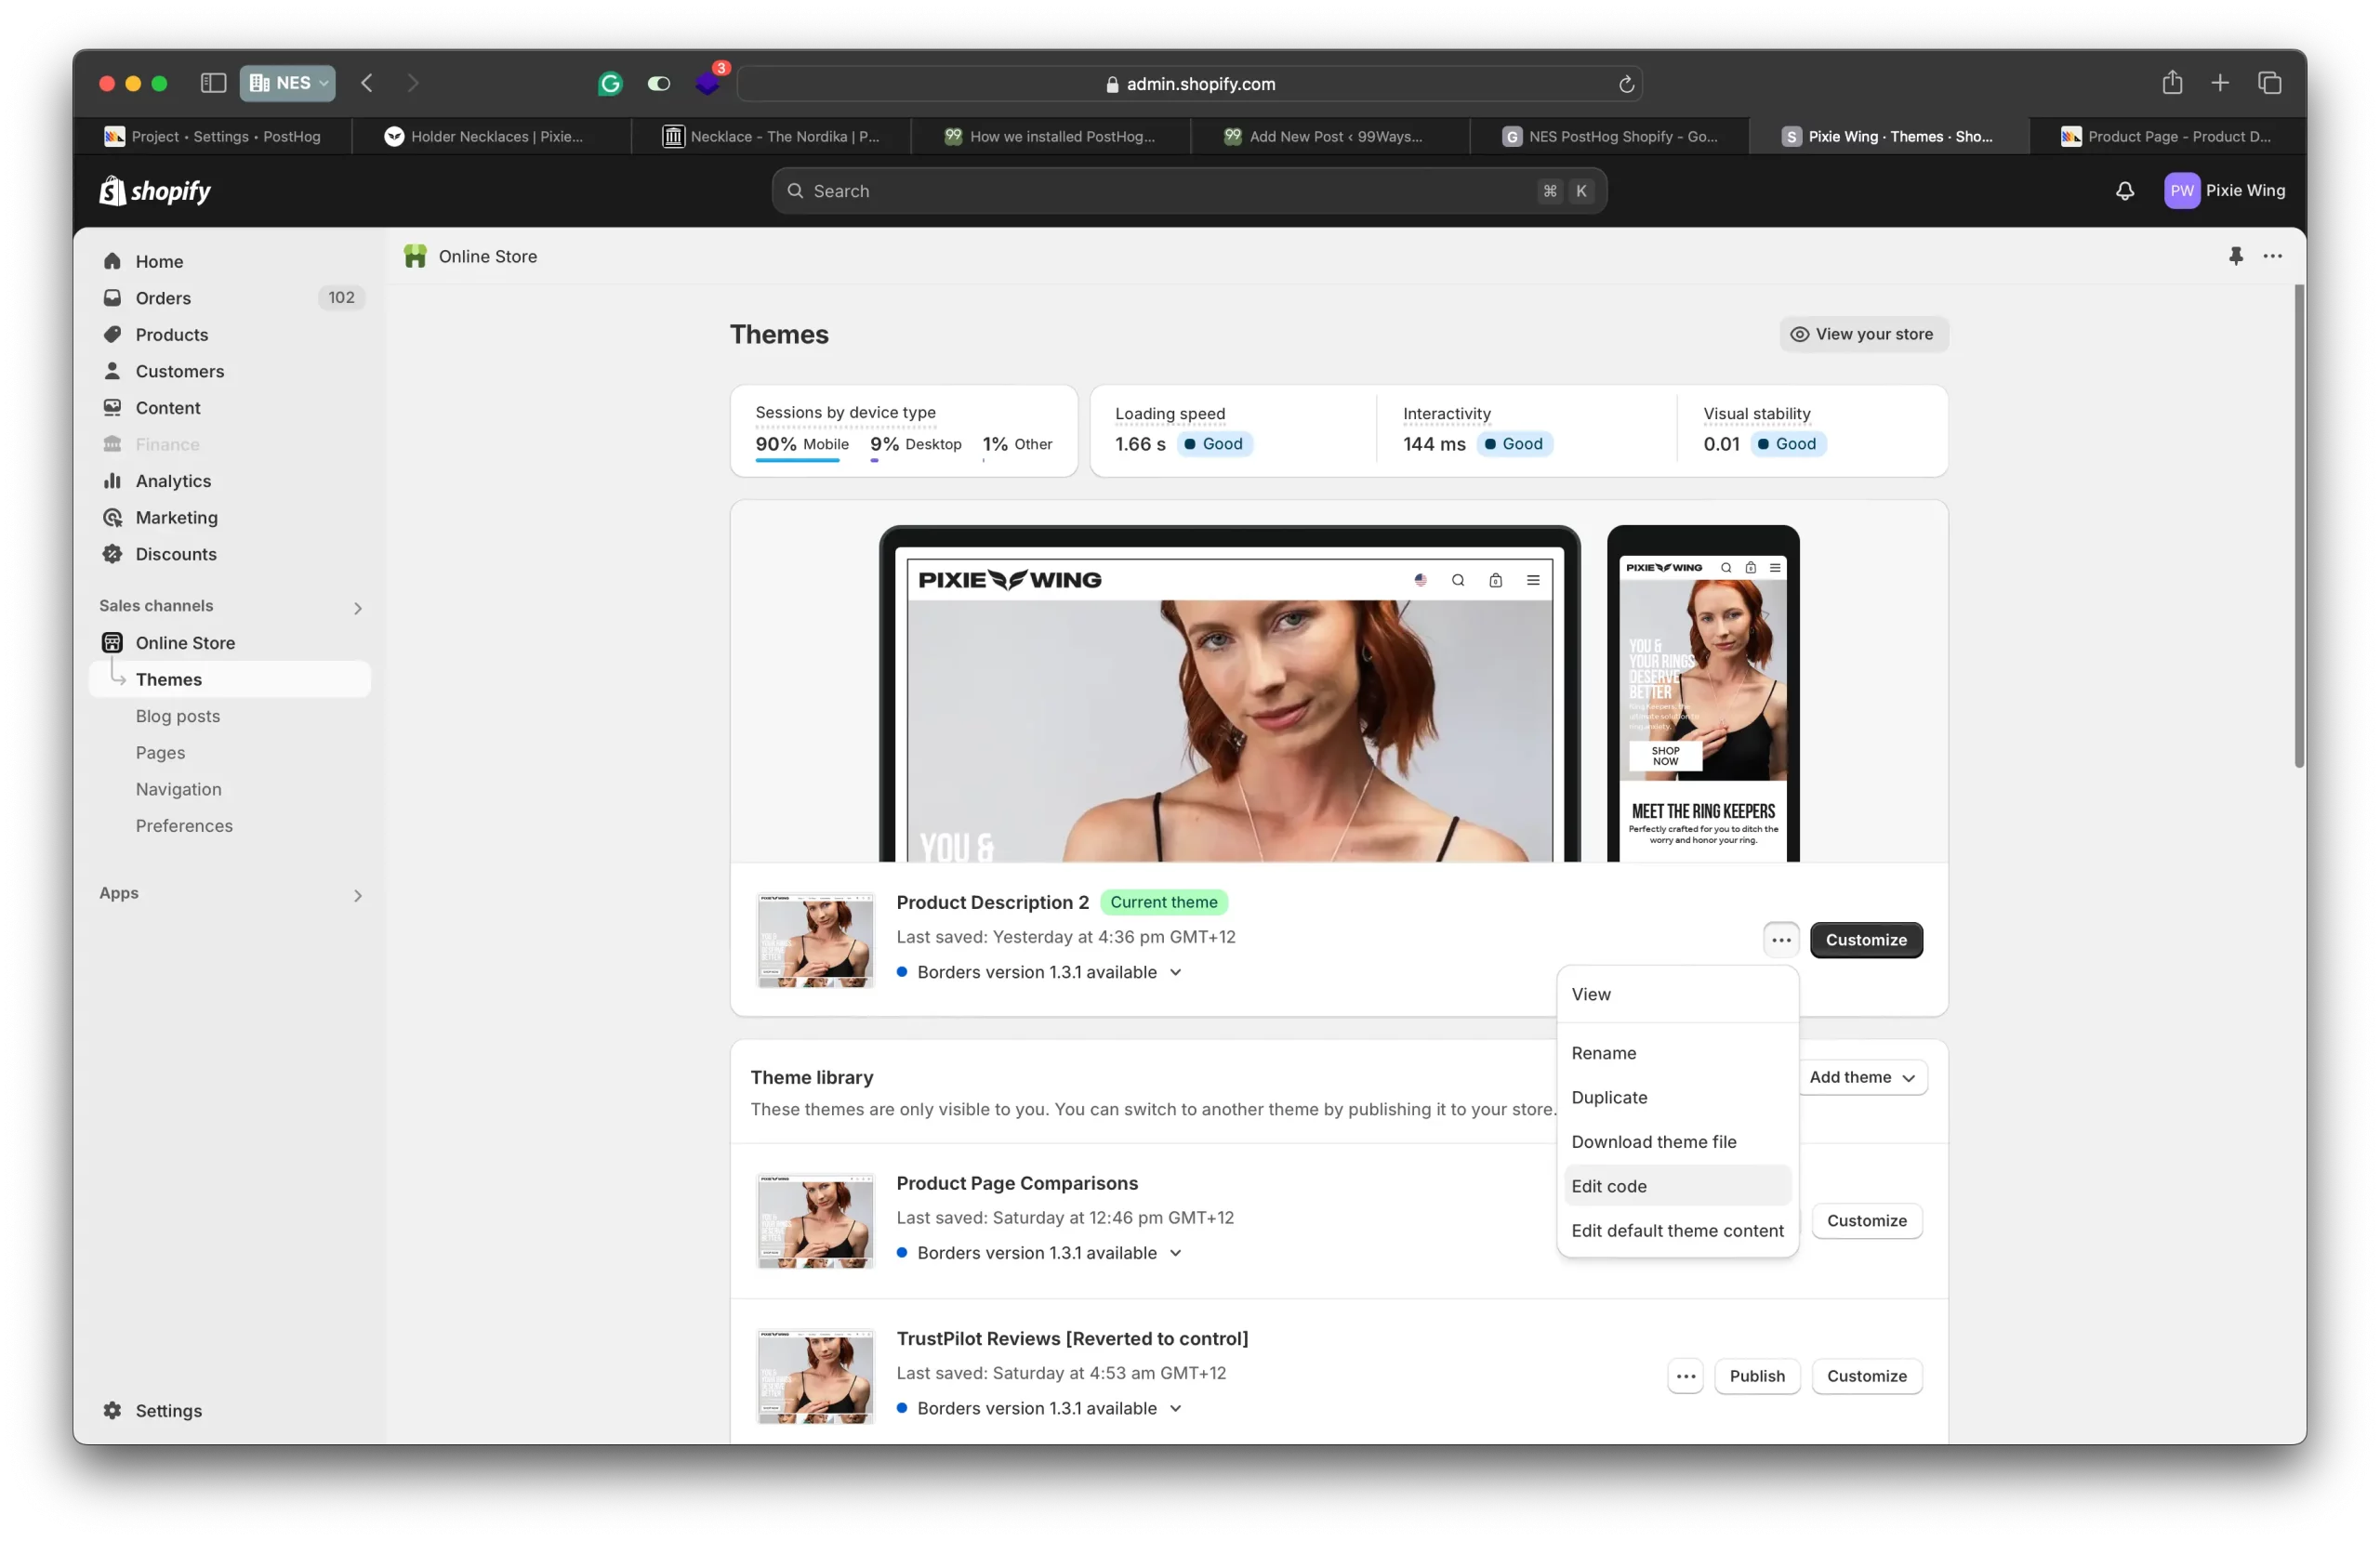
You will see your theme files there. It will look like this:
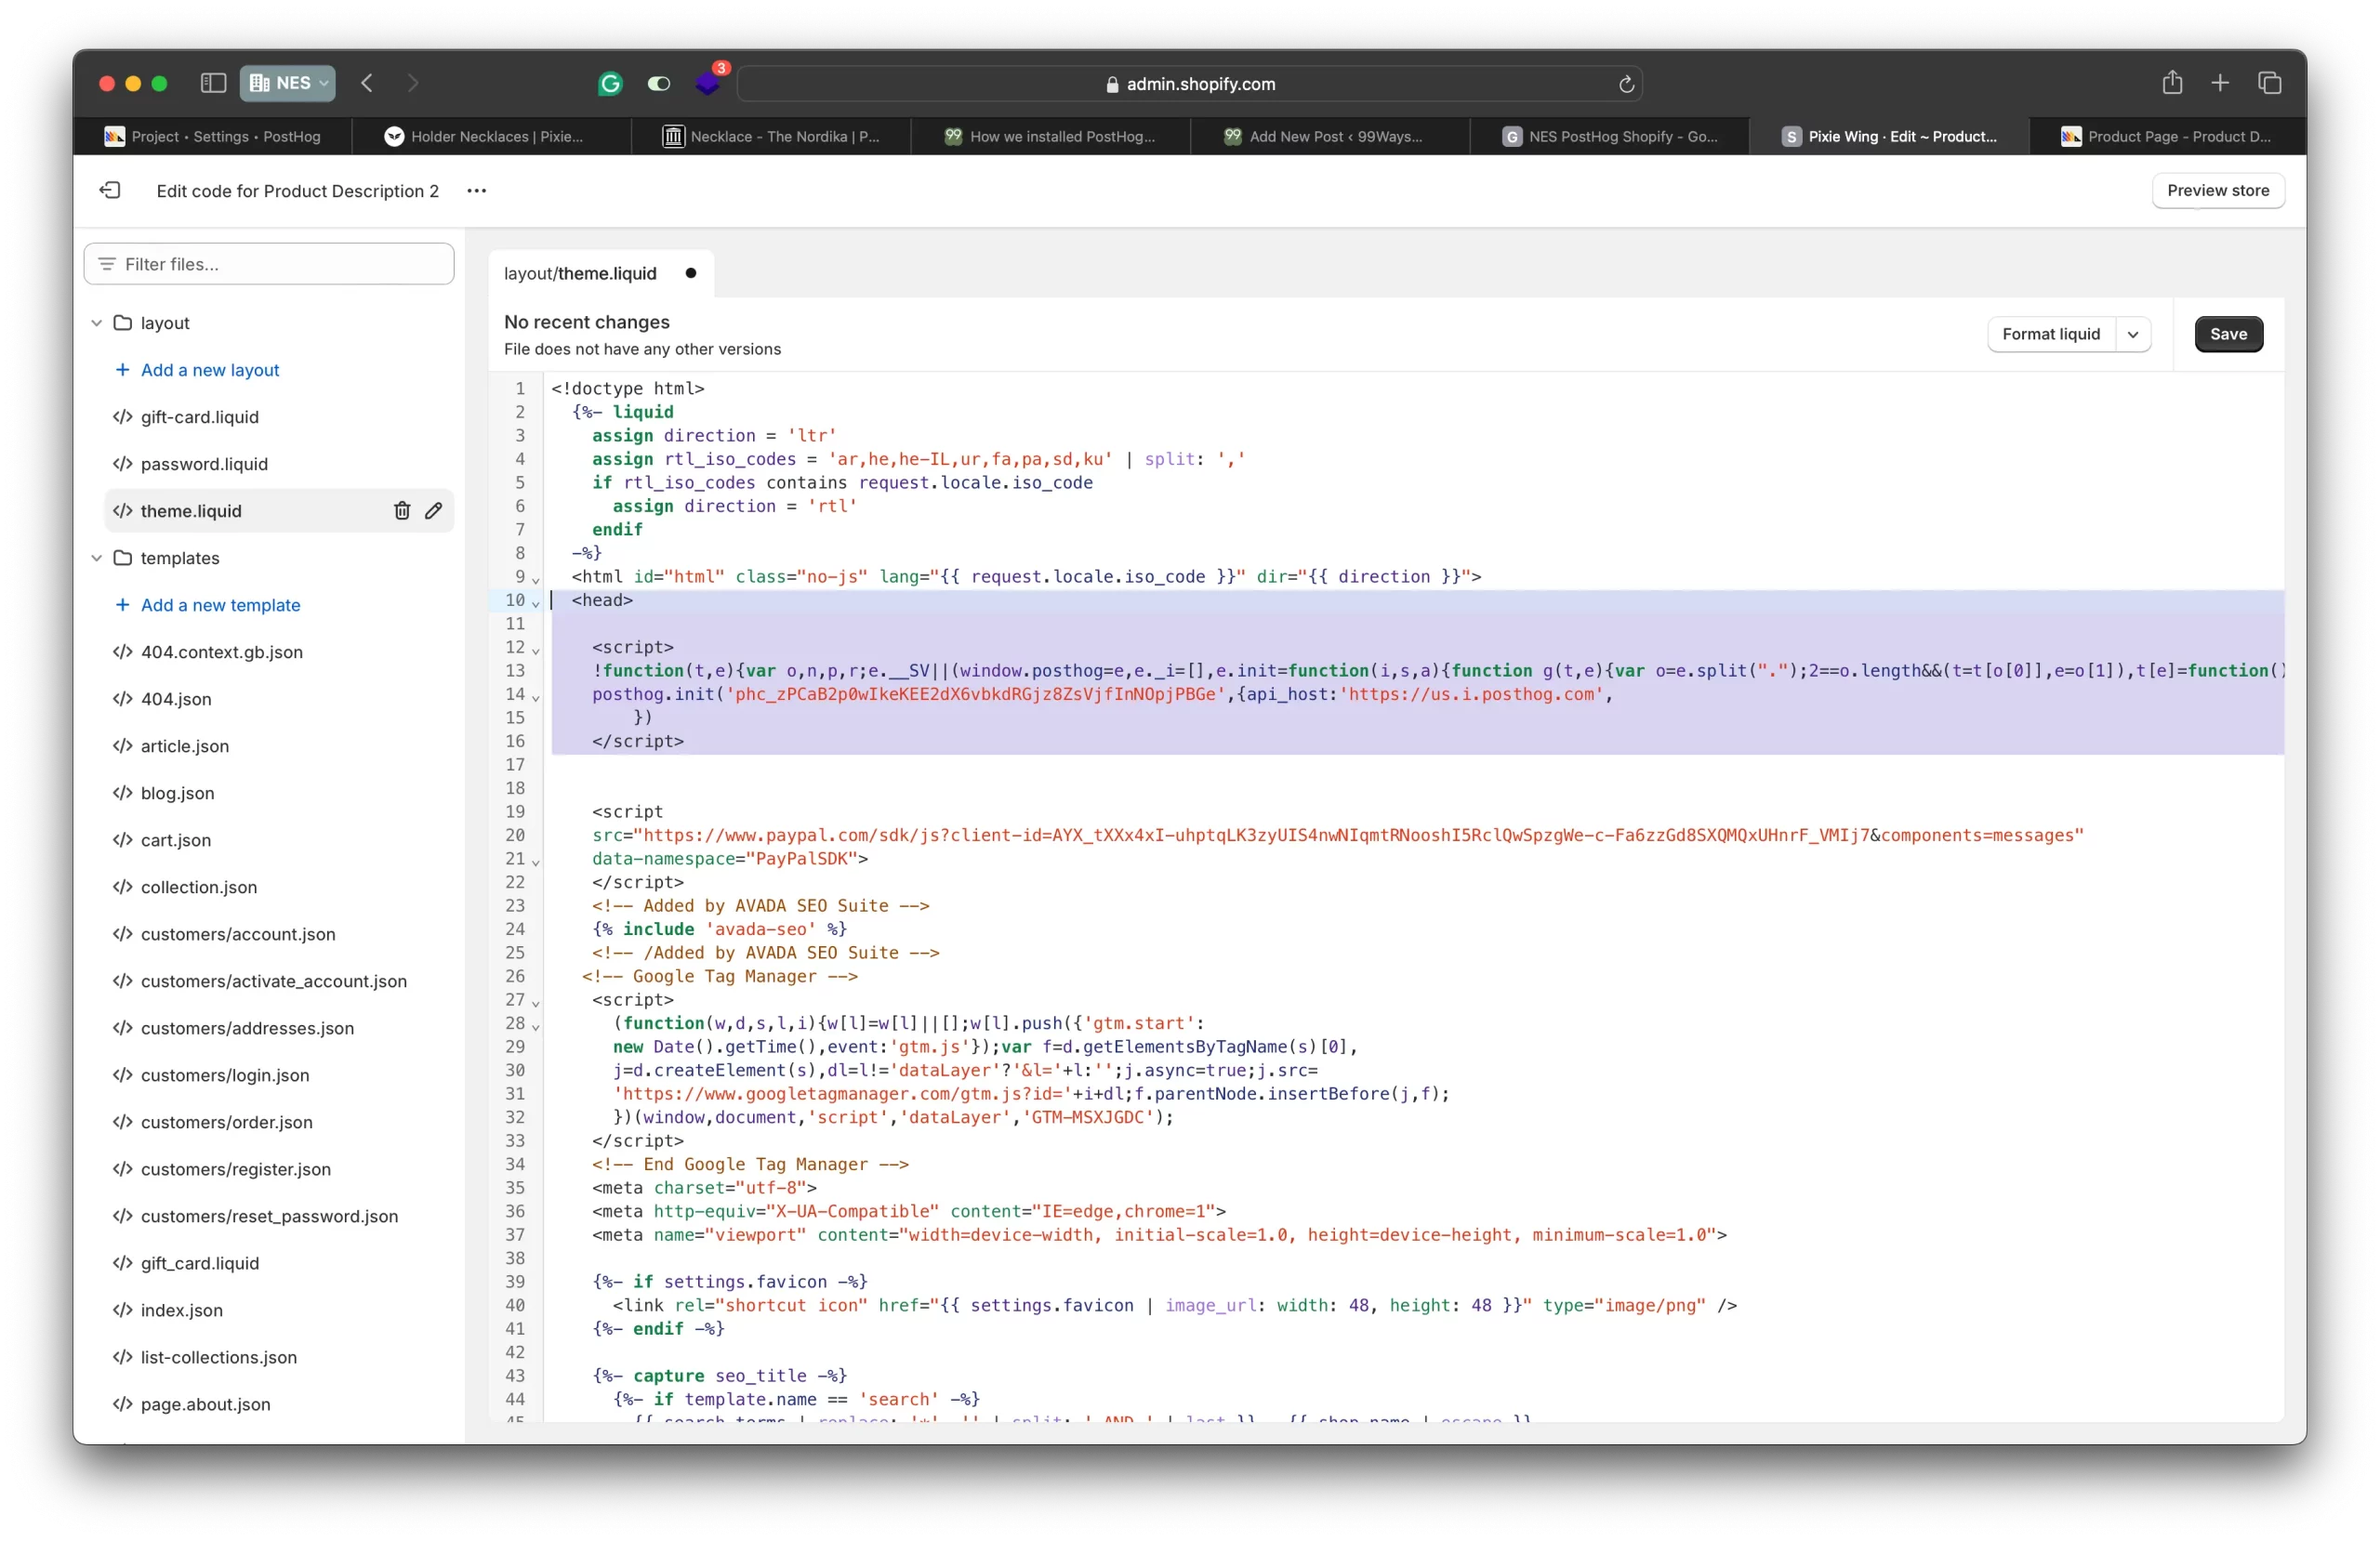
In the left sidebar, find and click on theme.liquid.
Paste your copied PostHog snippet just after the opening <head> tag.
Click Save and exit.
This will ensure that the PostHog tracking script is loaded on every page of your store.
Step 3: Capture Shopify events in PostHog
Capturing native Shopify events like checkout_complete or checkout_started is crucial for reliable conversion rate optimization analysis. To do this, we’ll use Customer Events.
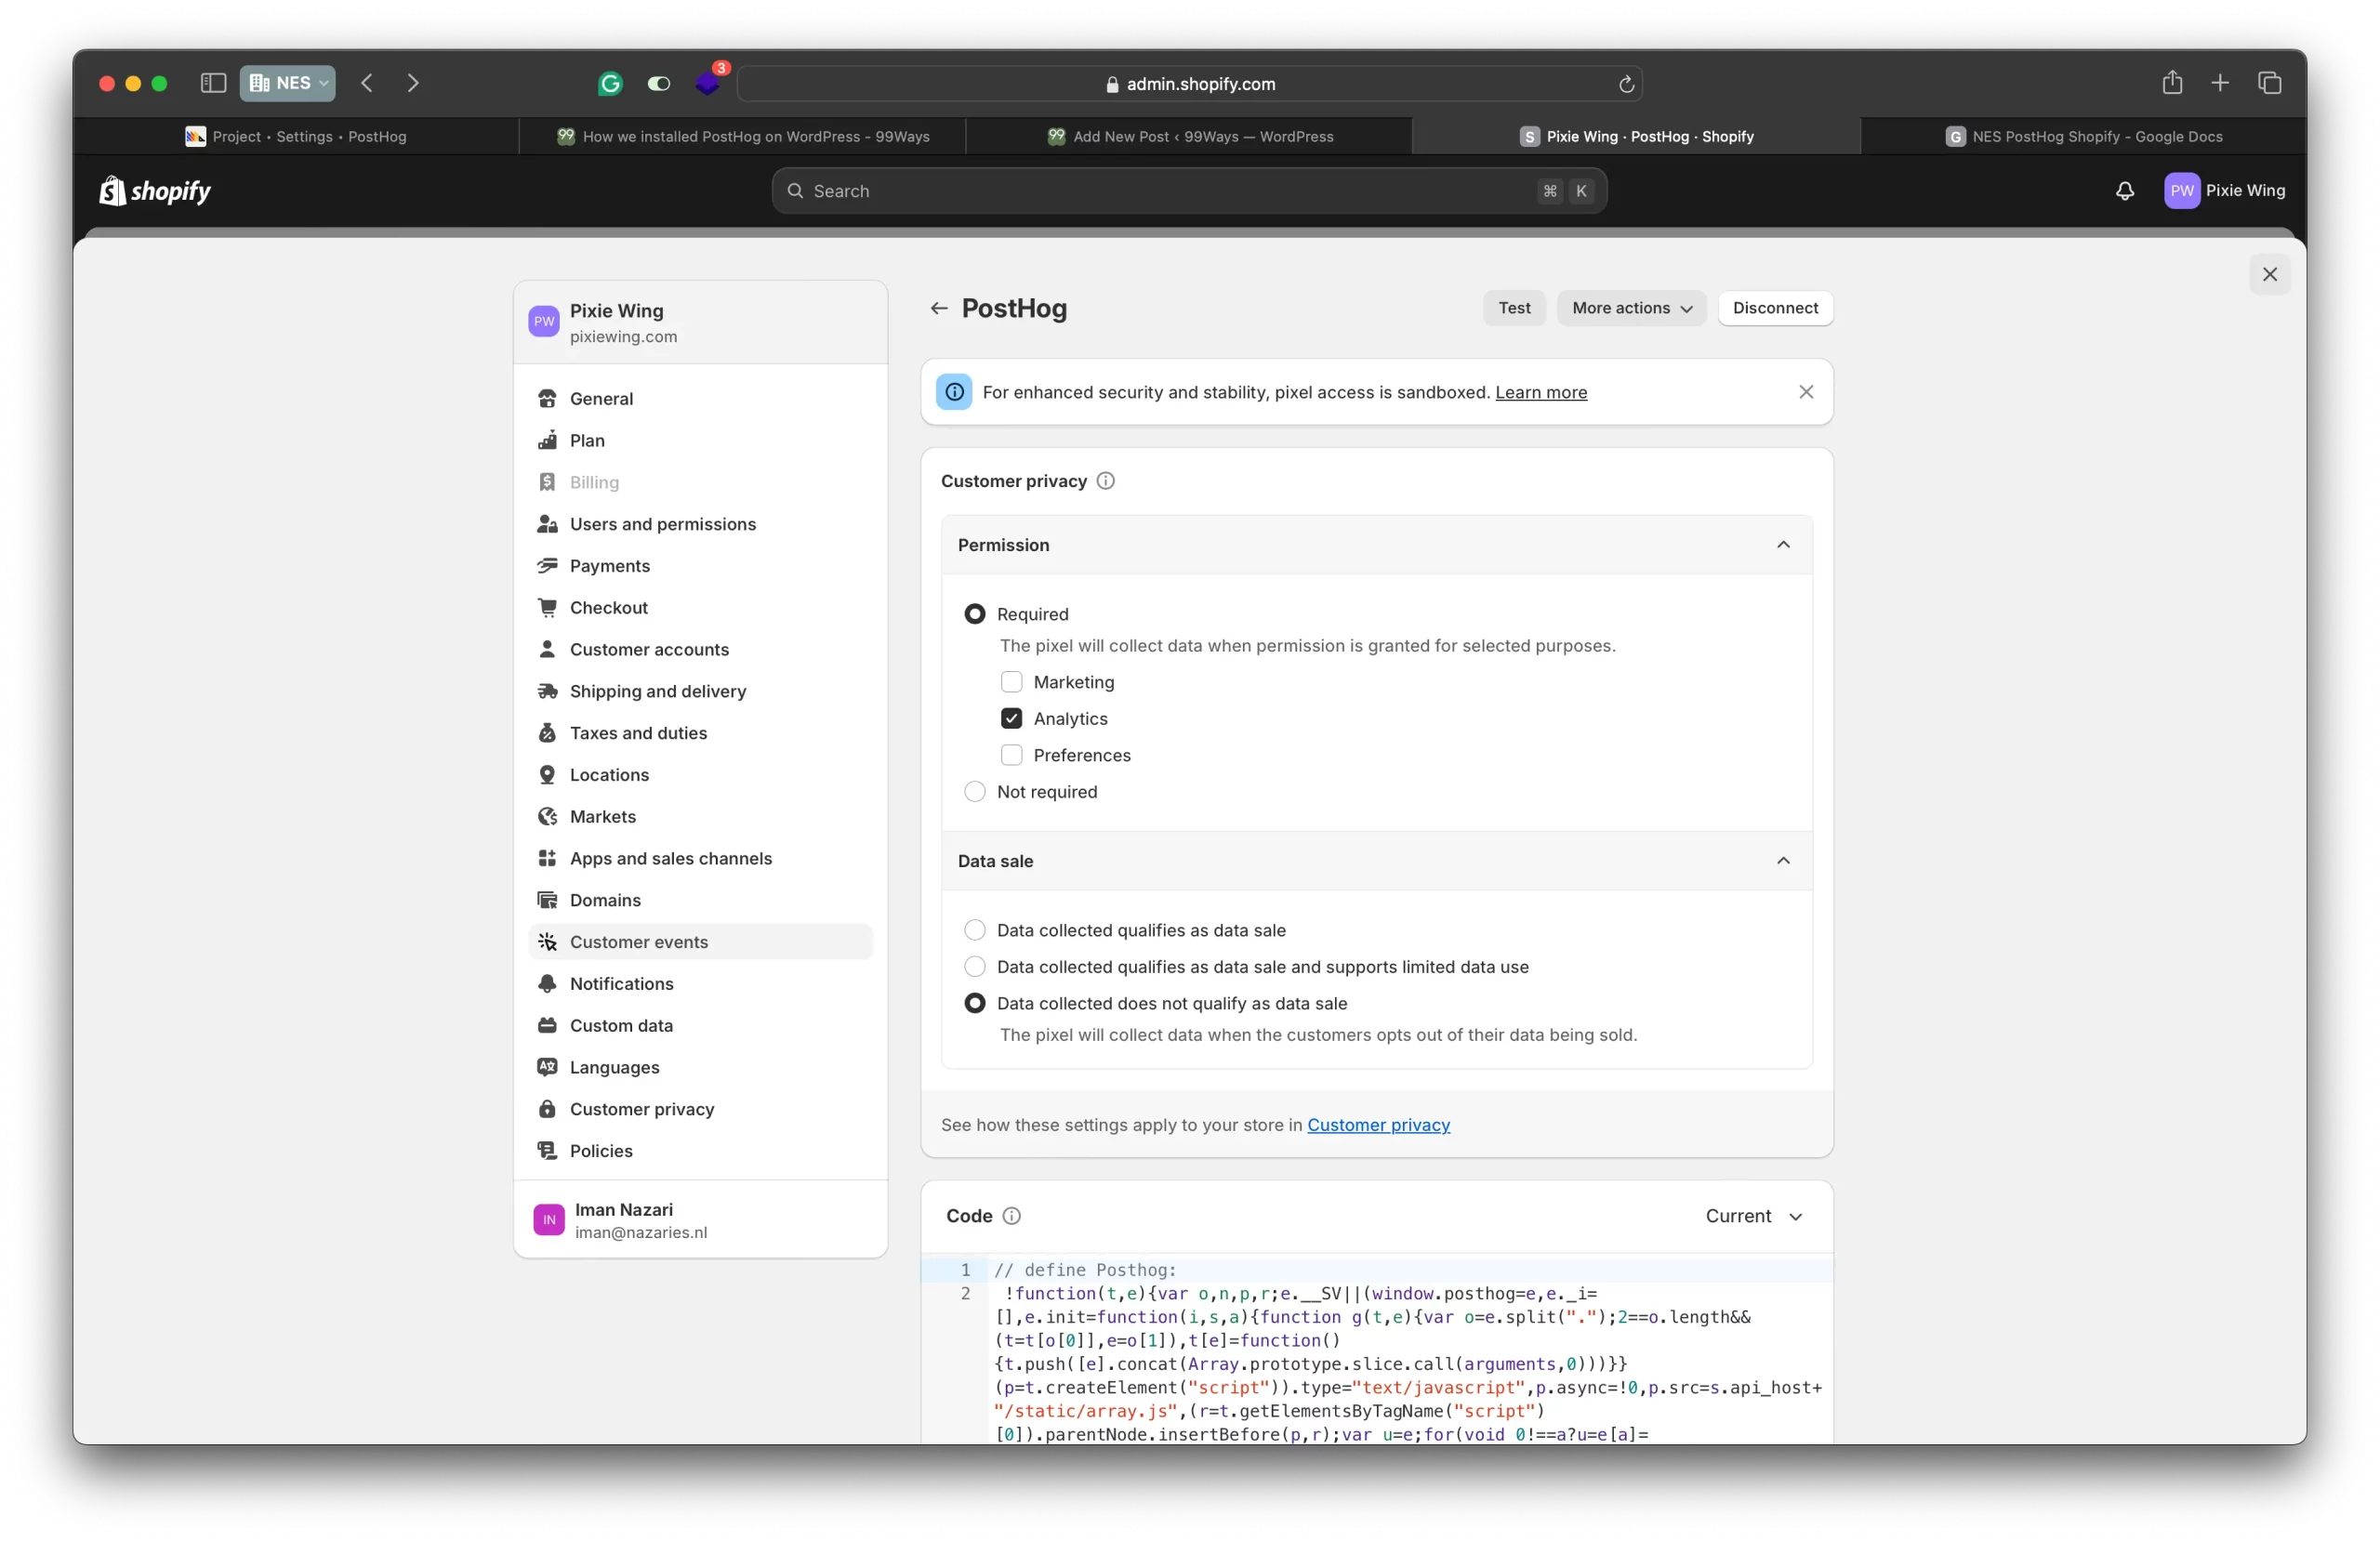
- In your Shopify admin dashboard, click on Settings (icon in the bottom left corner).
- Select Customer events from the left sidebar.
- Click the Add custom pixel button.
- In the dialog box that opens enter a name for your pixel (e.g., PostHog).
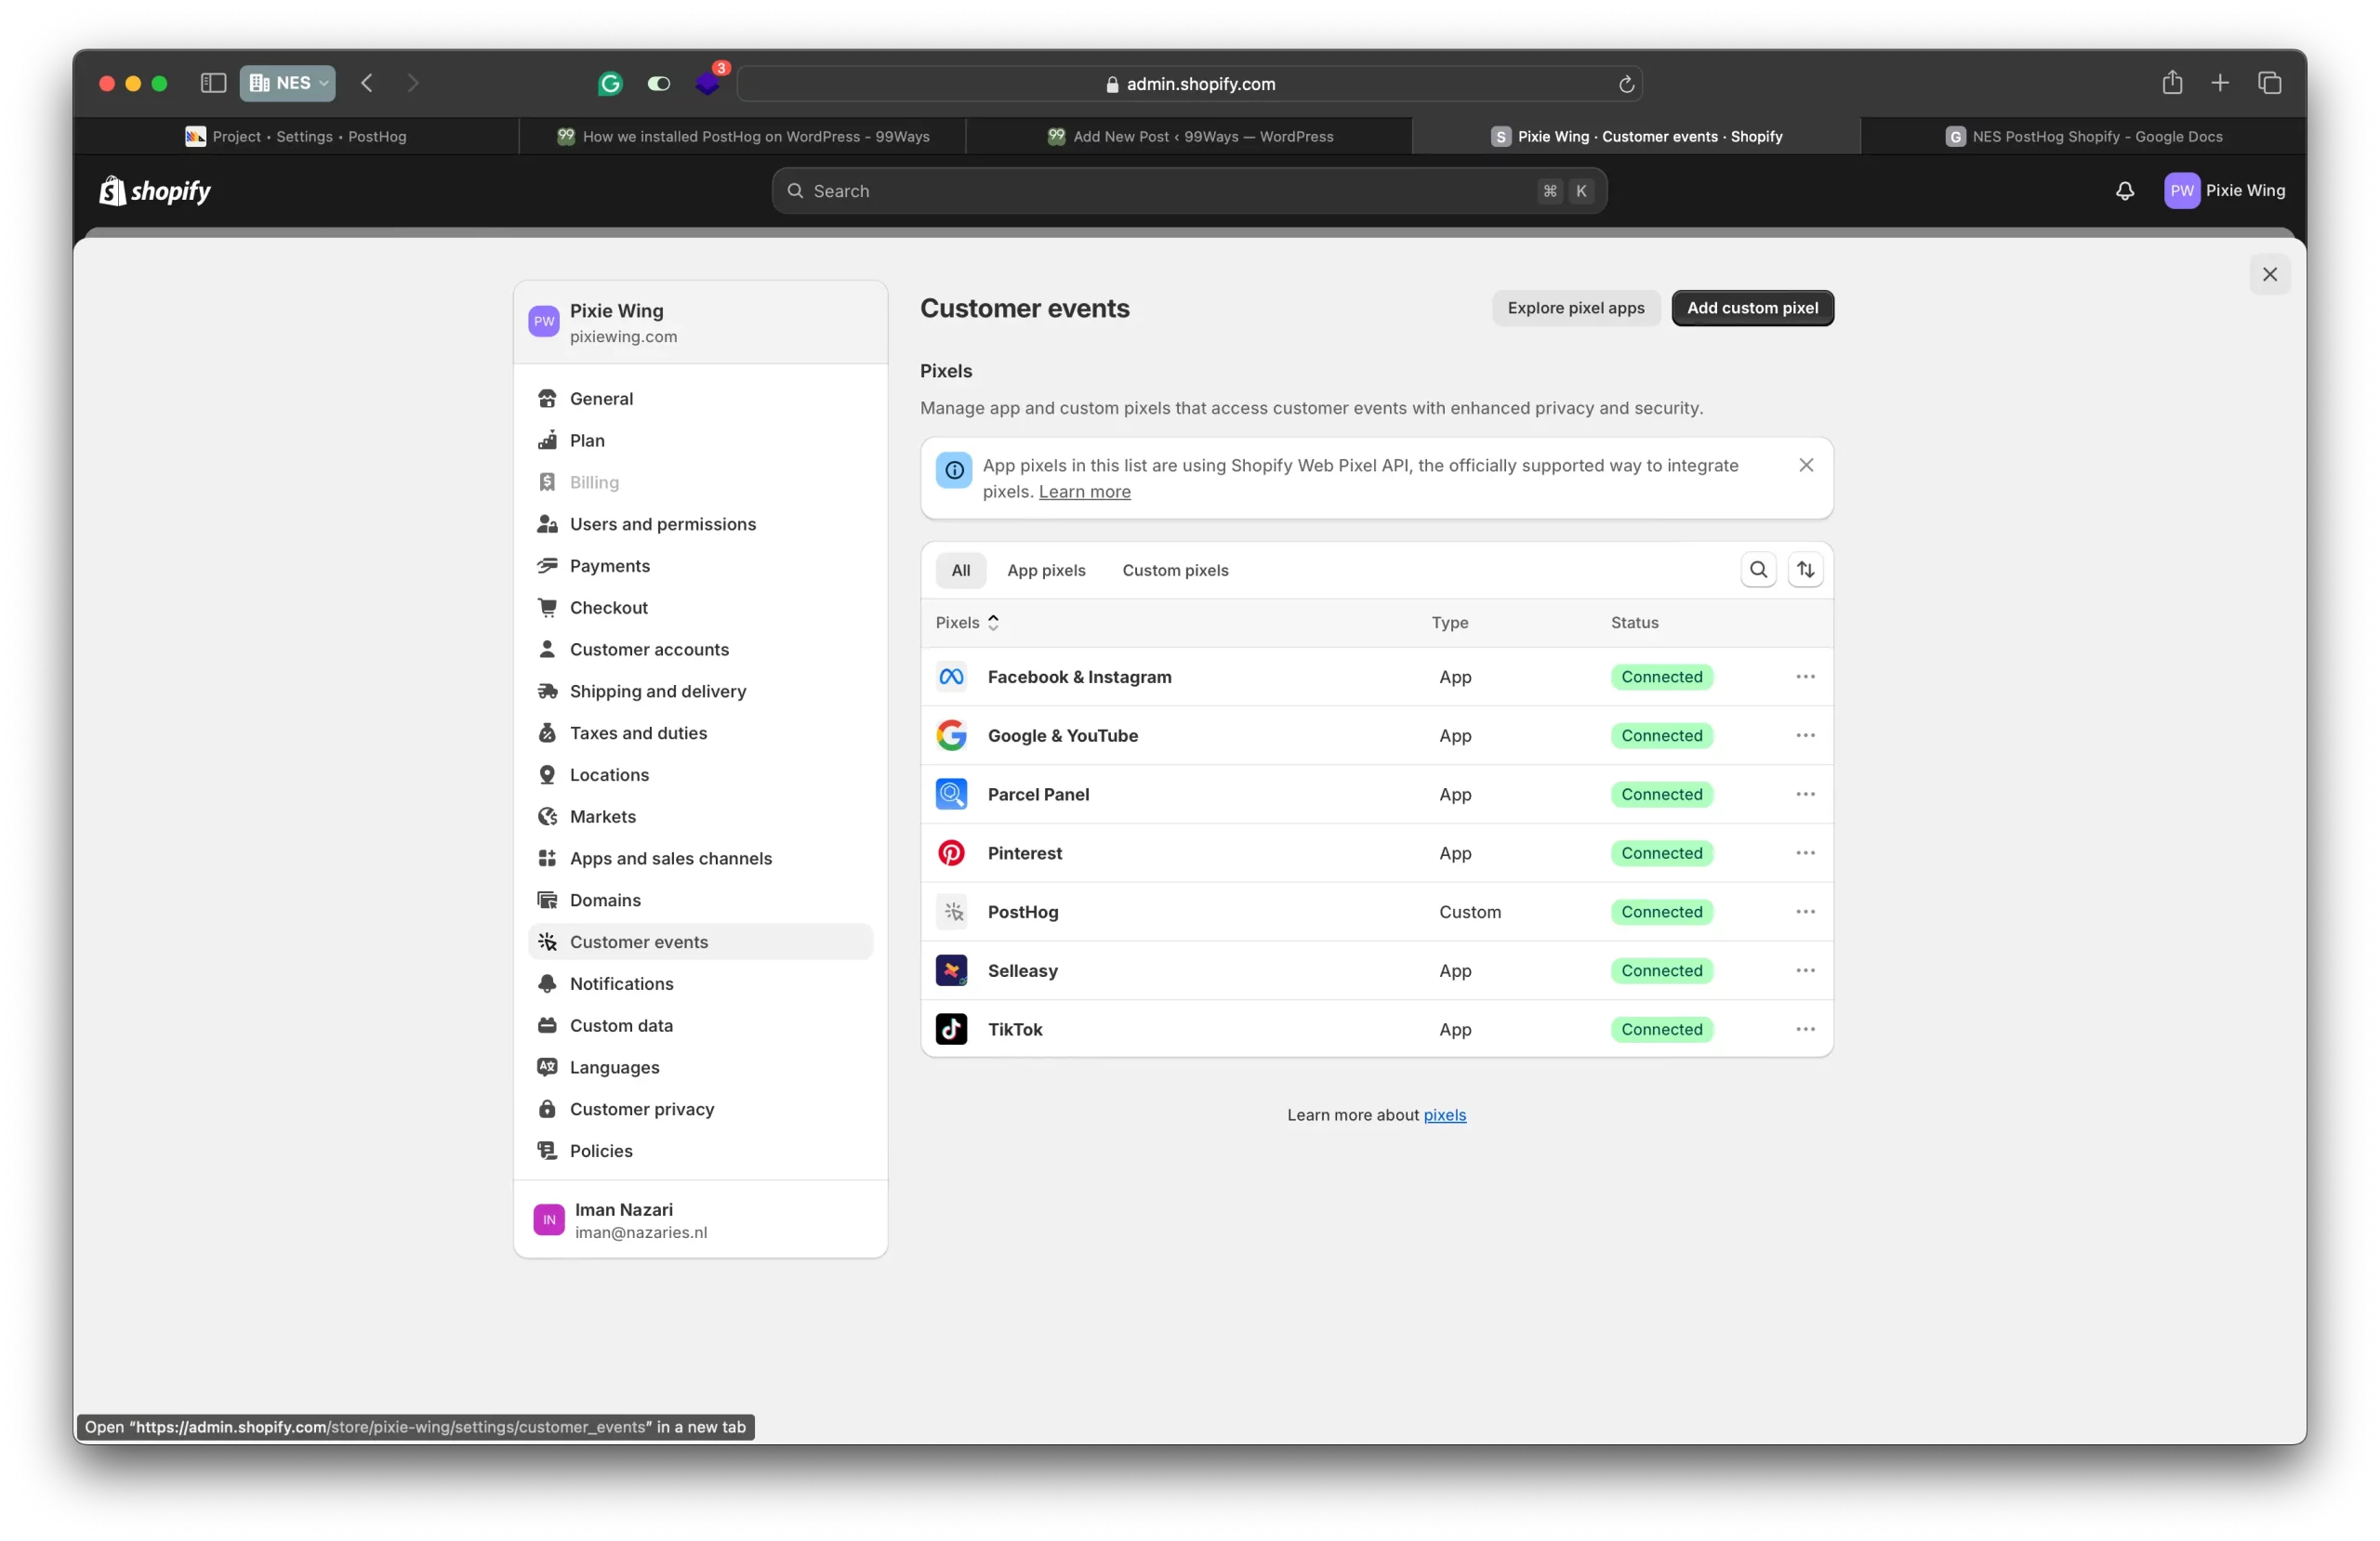
Configure your pixel’s customer privacy settings according to your store’s privacy policy and compliance requirements.
Paste the following snippet into the code section.
For the available customer-event subscriptions and pixel behavior, see Shopify’s Web Pixels API documentation.
// This script is designed to integrate Shopify store events with PostHog analytics.
// It listens to Shopify's standard customer events, processes their data, and sends it to PostHog.

// --- Helper Functions for Data Processing ---

/**
 * Flattens a nested JavaScript object into a single-level object.
 * Nested keys are combined with underscores. For example, { a: { b: 1 } } becomes { a_b: 1 }.
 * This is useful for preparing complex event data for analytics platforms like PostHog
 * that may prefer or require flat data structures.
 * @param {object} obj - The object to flatten.
 * @param {string} parentKey - The prefix for keys in the current level of recursion.
 * @param {object} result - The accumulator object for the flattened properties.
 * @returns {object} The flattened object.
 */
function flattenObject(obj, parentKey = '', result = {}) {
  for (const key in obj) {
    if (obj.hasOwnProperty(key)) {
      const newKey = parentKey ? `${parentKey}_${key}` : key;
      if (obj[key] && typeof obj[key] === 'object') {
        if (Array.isArray(obj[key])) {
          // If the property is an array, process it with processArray
          processArray(obj[key], newKey, result);
        } else {
          // If it's a nested object, recurse
          flattenObject(obj[key], newKey, result);
        }
      } else {
        // If it's a primitive value, add it to the result
        result[newKey] = obj[key];
      }
    }
  }
  return result;
}

/**
 * Processes arrays within an object being flattened by `flattenObject`.
 * Array elements are keyed with their index, e.g., array_0, array_1.
 * If an array element is an object, it's flattened recursively.
 * @param {Array} arr - The array to process.
 * @param {string} parentKey - The key for this array in the parent object.
 * @param {object} result - The accumulator object for the flattened properties.
 */
function processArray(arr, parentKey, result) {
  arr.forEach((item, index) => {
    const arrayKey = `${parentKey}_${index}`;
    if (item && typeof item === 'object') {
      // If an array item is an object, flatten it
      flattenObject(item, arrayKey, result);
    } else {
      // Otherwise, add the primitive item to the result
      result[arrayKey] = item;
    }
  });
}

// --- Main Event Processing and Reporting Function ---

/**
 * Processes a Shopify event, flattens its data, and reports it to PostHog.
 * @param {object} event - The Shopify event object.
 *                         Contains `name` (string) and `data` (object), `context` (object).
 */
function processAndReportEvent(event) {

  // Filter out common, high-volume events that might not be needed for all analyses.
  // PostHog's snippet by default captures page_viewed, so this avoids duplication if autocapture is on for pageviews.
  if (["page_viewed", "product_viewed", "collection_viewed"].includes(event.name)) {
     return; // Exit if the event is one of these types
  }

  // Validate that event data exists and is an object.
  if (!event.data || typeof event.data !== 'object') {
    console.log('Invalid event (missing or non-object data):', event.name, event.data);
    return; // Exit if data is invalid
  }

  // --- PostHog Initialization ---
  // This is the standard PostHog JavaScript snippet.
  // It ensures PostHog is loaded and initialized before any events are sent.
  // IMPORTANT: This initialization should ideally happen once per page load,
  // usually in the <head> of your HTML or at the very start of your main JS file.
  // If this `processAndReportEvent` function can be called multiple times,
  // consider moving the init block to a place where it's guaranteed to run only once.
  // However, PostHog's init is idempotent, so calling it multiple times won't break things,
  // but it's less efficient.
  !function(t,e){var o,n,p,r;e.__SV||(window.posthog=e,e._i=[],e.init=function(i,s,a){function g(t,e){var o=e.split(".");2==o.length&&(t=t[o[0]],e=o[1]),t[e]=function(){t.push([e].concat(Array.prototype.slice.call(arguments,0)))}}(p=t.createElement("script")).type="text/javascript",p.crossOrigin="anonymous",p.async=!0,p.src=s.api_host.replace(".i.posthog.com","-assets.i.posthog.com")+"/static/array.js",(r=t.getElementsByTagName("script")[0]).parentNode.insertBefore(p,r);var u=e;for(void 0!==a?u=e[a]=[]:a="posthog",u.people=u.people||[],u.toString=function(t){var e="posthog";return"posthog"!==a&&(e+="."+a),t||(e+=" (stub)"),e},u.people.toString=function(){return u.toString(1)+".people (stub)"},o="init be ys Ss me gs ws capture Ne calculateEventProperties xs register register_once register_for_session unregister unregister_for_session Rs getFeatureFlag getFeatureFlagPayload isFeatureEnabled reloadFeatureFlags updateEarlyAccessFeatureEnrollment getEarlyAccessFeatures on onFeatureFlags onSurveysLoaded onSessionId getSurveys getActiveMatchingSurveys renderSurvey canRenderSurvey canRenderSurveyAsync identify setPersonProperties group resetGroups setPersonPropertiesForFlags resetPersonPropertiesForFlags setGroupPropertiesForFlags resetGroupPropertiesForFlags reset get_distinct_id getGroups get_session_id get_session_replay_url alias set_config startSessionRecording stopSessionRecording sessionRecordingStarted captureException loadToolbar get_property getSessionProperty Is ks createPersonProfile Ps bs opt_in_capturing opt_out_capturing has_opted_in_capturing has_opted_out_capturing clear_opt_in_out_capturing $s debug Es getPageViewId captureTraceFeedback captureTraceMetric".split(" "),n=0;n<o.length;n++)g(u,o[n]);e._i.push([i,s,a])},e.__SV=1)}(document,window.posthog||[]);
  // Initialize PostHog with your project API key and specific configurations.
  // - `api_host`: Your PostHog instance URL.
  // - `person_profiles`: 'always' ensures person profiles are created/updated on identify/alias calls.
  // - `autocapture`: false - disables automatic capturing of clicks, form submissions, etc. (as we're doing it manually).
  // - `capture_pageview`: false - disables automatic pageview capturing (Shopify might send its own, or you handle it separately).
  // - `disable_session_recording`: true - disables session recording if not needed.
  // - `capture_pageleave`: false - disables capturing page leave events.
  // - `advanced_disable_decide`: true - potentially disables fetching feature flags, etc., on init if managed elsewhere.
  posthog.init('YOUR_POSTHOG_PROJECT_API_KEY',{api_host:"https://us.i.posthog.com", defaults: '2025-05-24', person_profiles: 'always',autocapture: false, capture_pageview: false, disable_session_recording: true, capture_pageleave: false, advanced_disable_decide:true});

  // Shopify event data often has a nested structure, e.g., event.data.checkout, event.data.product.
  // We extract the main nested data object first.
  const eventDataKey = Object.keys(event.data)[0]; // Gets the first key, e.g., 'checkout', 'product'
  const nestedData = event.data[eventDataKey];
  const flattenedData = flattenObject(nestedData); // Flatten the nested data for PostHog

  // Prepare the properties object to be sent with the PostHog event.
  let properties = {
    eventDataKey: eventDataKey, // Store the original top-level key from event.data for reference
    ...flattenedData,           // Spread the flattened event data
    // Add standard PostHog properties related to the current page URL:
    $current_url: event.context.document.location.href,
    $host: event.context.document.location.host,
    $pathname: event.context.document.location.pathname,
  };

  // Special handling for specific checkout events to identify users and set user properties.
  if (["checkout_completed", "checkout_contact_info_submitted"].includes(event.name)) {
    // For these events, we want to set user properties in PostHog.
    // `$set` is a PostHog specific instruction to update user properties.
    properties.$set = {
      email: nestedData.email, // Assuming email is available directly in nestedData
      first_name: nestedData.billingAddress?.firstName, // Safely access firstName
      last_name:  nestedData.billingAddress?.lastName,  // Safely access lastName
      // `alias` is listed here but `posthog.alias()` is called separately below.
      // It's good practice to include it if these properties are meant to define the user.
      alias: nestedData.email,
    };

    // Send the event to PostHog
    let res = posthog.capture(event.name, properties);

    // `posthog.alias()` is used to link the current anonymous user ID with a known identifier (email).
    // This is crucial for tracking users across sessions and devices once they identify themselves.
    // It links the current `posthog.get_distinct_id()` to `nestedData.email`.
    // Ensure `nestedData.email` is valid and available.
    if (nestedData.email) {
      posthog.alias(posthog.get_distinct_id(), nestedData.email);
    }

    return res;
  }
  else {
    // For all other events, capture them with the prepared properties.
    let res = posthog.capture(event.name, properties);
    return res;
  }
}

// --- Shopify Event Subscription ---

// `analytics.subscribe` is a Shopify specific API to listen to various store events.
// "all_standard_events": Subscribes to all standard customer events emitted by Shopify.
// When any such event occurs, the `processAndReportEvent` function is called with the event object.
analytics.subscribe("all_standard_events", (event) => processAndReportEvent(event));
Then to save, click the connect button.
The reason we use this custom snippet is to capture all standard events, helping us gain a clearer understanding of user behavior on our website. You can view the exact events captured by this snippet through this link.
Step 4: Verify Installation
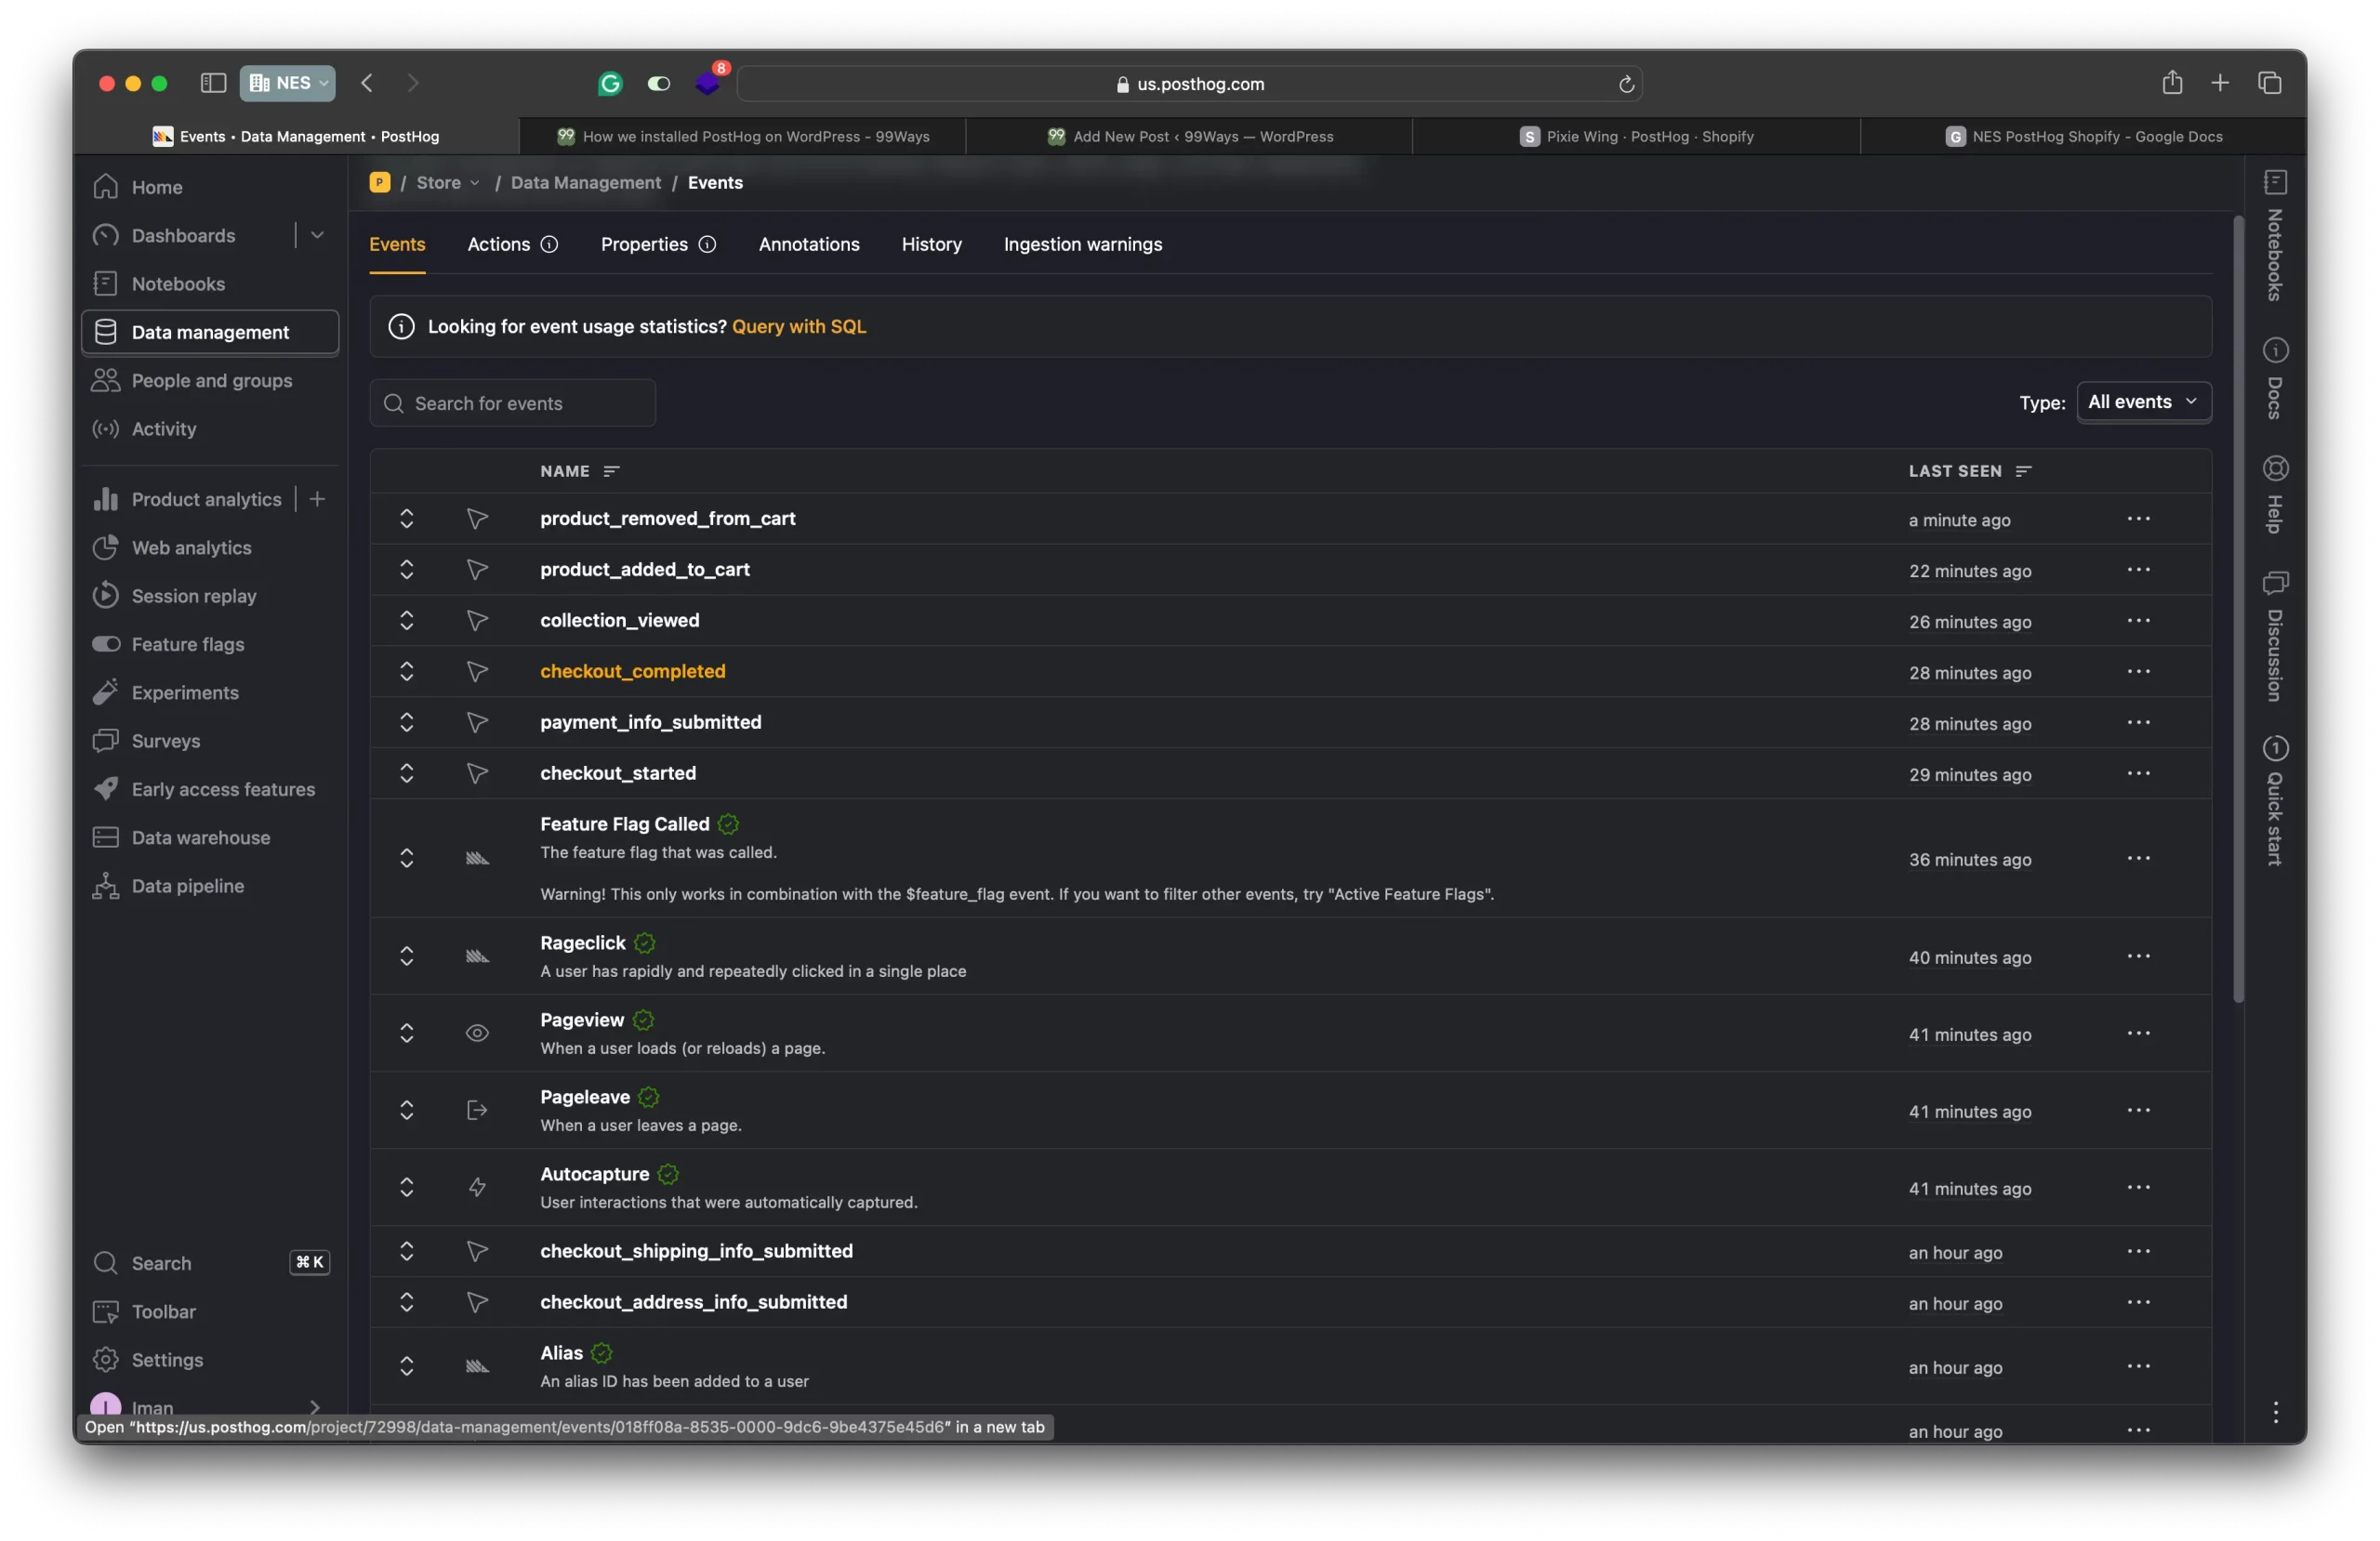
You should now be able to see events like Pageview, checkout_started, product_added_to_cart, and checkout_completed coming into PostHog. For the checkout_completed event’s details, see Shopify’s checkout_completed event reference.
- Go back to your PostHog dashboard.
- Navigate to Activity or Events to verify that data is being collected.
- Perform some actions on your Shopify store (e.g., add a product to the cart) to test if events are recorded.
For a broader check of whether your implementation is ready to trust, read our PostHog audit.
Conclusion
By following these steps, you can integrate PostHog with your Shopify store to gain deeper insights into customer behavior and improve your conversion rates. Once tracking is stable, learn how to set up a PostHog A/B test on Shopify. Happy analyzing!
For the most up-to-date guidance on integrating PostHog with your Shopify store, read our latest article: "Best Plugins to Install PostHog on Shopify in 2025"
Need further assistance? Feel free to leave a comment below or reach out to us for more help.
Frequently asked questions
What does PostHog add beyond Shopify’s built-in analytics?
Why do you use both the PostHog snippet and a Shopify custom pixel?
theme.liquid ensures PostHog runs on every storefront page and can autocapture clicks, page views, and other client-side interactions. The Shopify custom pixel subscribes to Shopify’s standard customer events (like checkout_started and checkout_completed) from the Web Pixels API, including checkout and post-purchase pages that the theme snippet alone may not fully cover. Using both gives you full funnel coverage. (+)Does this method work with all Shopify Online Store 2.0 themes?
theme.liquid (or equivalent layout file where you can inject code into <head>), the PostHog snippet will load across all pages. The custom pixel part is theme-independent because it’s managed from Settings → Customer events, so it still fires on checkout and post-purchase, even if you later change themes. (+)Which Shopify events does this setup send into PostHog?
page_viewed, product_viewed, cart_viewed, product_added_to_cart, product_removed_from_cart, checkout_started, checkout_contact_info_submitted, checkout_shipping_info_submitted, payment_info_submitted, and checkout_completed.Your pixel then forwards those events to PostHog via
posthog.capture, so you see all key funnel steps inside PostHog.Can I track extra custom events, like upsells or subscriptions?
In that code, you can call
posthog.capture('my_custom_event', { …properties }) to send any event you care about—upsell clicks, subscription activations, post-purchase surveys, etc. into PostHog.Will installing PostHog slow down my Shopify store?
As with any script, there is some overhead, but for a normal store it’s negligible if implemented correctly.
How do I verify PostHog is tracking my Shopify events correctly?
After installation:
-
Open your store in a fresh browser session and perform key actions (view product, add to cart, start checkout, complete test order).
-
In PostHog, go to Events / Activity and filter by your recent events to confirm
page_viewed,product_added_to_cart,checkout_started,checkout_completed, etc. are arriving with sensible properties. -
If something’s missing, add
console.log()inside your custom pixel or use browser dev tools to ensure the pixel runs on the right pages and sends theposthog.capturecalls.
Can I use this setup to run A/B tests on my Shopify store?
Yes. Once PostHog is installed, you can use Experiments and feature flags to run A/B tests.
On Shopify, you usually:
-
Use a feature flag to assign visitors to variant A or B.
-
Switch layouts, sections, or content in your theme based on that flag.
Conversions (like checkout_completed or product_added_to_cart) are already tracked by your custom pixel, so PostHog can calculate which variant wins.
Does this guide also apply to headless or Hydrogen storefronts?
Partially. For a headless / Hydrogen storefront:
-
You’d install the PostHog web SDK in your frontend framework instead of
theme.liquid. -
You can still use Shopify customer events + custom pixel to capture checkout events and send them to PostHog.
So the idea is the same, but the “theme snippet” piece becomes a frontend integration instead of a Liquid edit.
Is this PostHog + Shopify setup GDPR/CCPA friendly?
Shopify’s customer events and custom pixels also come with customer privacy settings, so you can respect consent preferences when your pixel runs.
You’re still responsible for implementing a compliant consent banner and configuring PostHog and your pixel to honor “do not track” choices; this setup just gives you the tools to do it.
Can I install PostHog on Shopify without touching any code?
There are third-party Shopify apps (for example, PixieHog) that wrap the PostHog–Shopify integration in a no-code UI and automatically subscribe to Shopify web pixel events.
For simple stores, that’s convenient. The manual method in this article gives you more control and visibility over exactly which events are captured and how they’re sent into PostHog.
Is PostHog’s free plan enough for a typical Shopify store?
If you have high traffic, lots of recordings, or heavy experimentation, you may eventually need a paid plan; but you can implement and validate this setup before committing.
Can I track multiple Shopify stores or markets in one PostHog project?
Yes. PostHog lets you:
-
Use one project and add a property like
store_idordomainto distinguish events from different stores, or -
Create separate projects per store inside the same organization if you want isolated dashboards and permissions.
Your custom pixel code can add those identifiers as properties on every posthog.capture call.
How does PostHog data compare to GA4 or Shopify reports?
They won’t match 1:1. GA4 and Shopify reports use their own definitions, sampling rules, and attribution windows. PostHog is event-based, unsampled, and focused on product and funnel analytics.
Use Shopify for financial/accounting numbers and GA4 for broad marketing reporting, but rely on PostHog for behavior analysis, funnel diagnostics, and A/B test results.
What should I do if checkout events don’t appear in PostHog?
If you’re seeing page views but no checkout events:
-
Confirm your custom pixel is added under Settings → Customer events and is enabled.
-
Check your pixel code is actually subscribing to events like
checkout_startedandcheckout_completedfrom Shopify’s Web Pixels API. -
Review privacy settings—if customer consent is required and not granted, the pixel may never fire.
-
Use
console.logand browser dev tools to verify the pixel runs on checkout pages and thatposthog.capturecalls are being executed.